hexo简单发布使用
前置使用环境要求
- git
- nodejs
安装Hexo
安装hexo
plaintext1
npm install -g hexo-cli
初始化
plaintext1
2
3
4hexo init 初始化文件夹
例如:hexo init MyBlog
cd MyBlog //进入这个MyBlog文件夹
npm install本地查看
plaintext1
2hexo g //生成静态文件
hexo server(或者简写:hexo s)) // 打开本地服务书写文章
plaintext1
2
3
4
5npm i hexo-deployer-git // 安装扩展 (第一次用的这个后面新建文章报错了。。。)
或者 npm install hexo-deployer-git --save
hexo new post "articl title" // 新建文章Page Front-matter
plaintext1
2
3
4
5
6
7
8
9
10
11---
title:
date:
type: (tags,link,categories这三个页面需要配置)
comments: (是否需要显示评论,默认true)
description:
top_img: (设置顶部图)
mathjax:
katex:
---
Page Front-matter
plaintext1
2
3
4
5
6
7
8
9
10
11
12
13
14
15
16
17---
title:
date:
tags:
categories:
keywords:
description:
top_img: (除非特定需要,可以不写)
comments 是否显示评论(除非设置false,可以不写)
cover: 缩略图
toc: 是否显示toc (除非特定文章设置,可以不写)
toc_number: 是否显示toc数字 (除非特定文章设置,可以不写)
copyright: 是否显示版权 (除非特定文章设置,可以不写)
mathjax:
katex:
hide:
---
发布
plaintext1
2
3
4hexo clean // 清除静态文件
hexo generate //生成静态
hexo deploy(简写 hexo d) //上传到github并部署hexo 定制使用
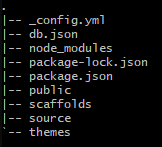
中间发现git bash中无法使用tree,发现下面这个博客,
node_modules是node.js各种库的目录,public是生成的网页文件目录,scaffolds里面就三个文件,存储着新文章和新页面的初始设置,source是我们最常用到的一个目录,里面存放着文章、各类页面、图像等文件,themes存放着主题文件,一般也用不到。我们平时写文章只需要关注
source/_posts这个文件夹就行了。来源: 洪卫の博客
hexo配置
文件根目录的 __config.yml
hexo官方文档
不同电脑上如何快速转移
瞎捣鼓了一阵子,发现最好最省事的方法就是
- 重新布置一个全新的文件夹,按步骤来就行
- 把原来的source,theme,配置文件等覆盖过来就行了


